
728x90
728x90
# 사전 준비
1. https://dev.mysql.com/downloads/file/?id=515796 에서 파일 다운받기
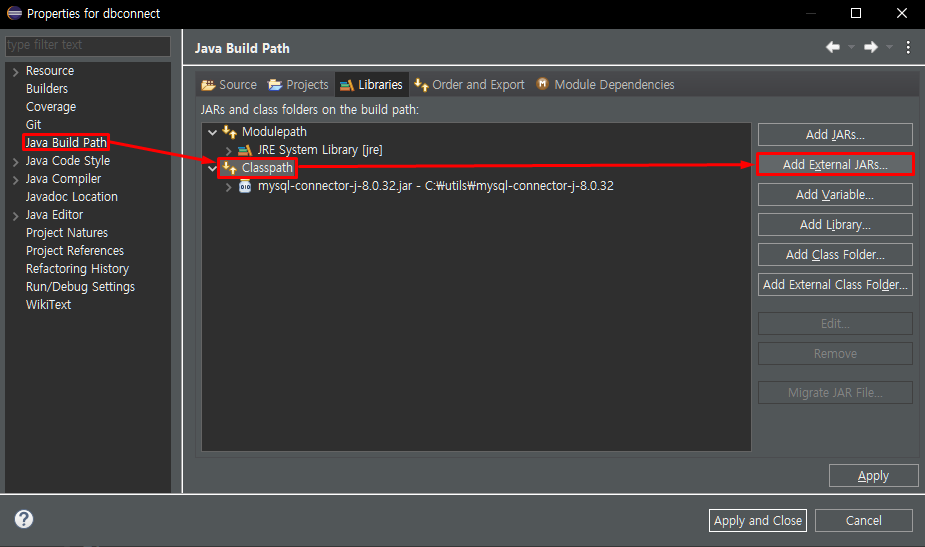
2. 프로젝트 우클릭 → [Properties]
3. 아래 경로로 들어가서 다운받은 파일 내에 있는 .jar 파일을 추가하기
# 필요한 정보
1) MySQL 계정 이름, 비밀번호
2) URL 주소 (포트번호, DB명 필요)
# 사용된 인터페이스
1) Connection
2) Statement
3) ResultSet
코드
# DB와 연결하는 클래스 설계
- format 메서드 사용법 : https://young0105.tistory.com/64
public class DBClient {

    // 변하지 않는 정보들은 상수로 선언
    private static final String DB_HOST = "localhost"; // IP 주소
    private static final int DB_PORT = 3306; // 포트 번호
    private static final String DB_CHARSET = "UTF-8"; // 사용 언어
    private static final String DB_USER_NAME = "계정이름"; // MySQL 계정 이름
    private static final String DB_PASSWORD = "비밀번호"; // MySQL 계정 비밀번호

    // 연결할 DB는 set 메서드로 바꾸면서 사용할 수 있게 변수로 선언
    private String DB_NAME = "DB명"; // DB 이름

    private Connection conn;

    // Connection을 여는 메서드
    public Connection getConnection() {
        // 방어적 코드
        if (conn == null) {
            String urlFormat = "jdbc:mysql://%s:%d/%s?serverTimezone=Asia/Seoul&characterEncoding=%s";
            // %로 지정된 공간에 순서대로 값이 들어감
            String url = String.format(urlFormat, DB_HOST, DB_PORT, DB_NAME, DB_CHARSET);

            try {
                // Connection 객체를 뽑을 드라이버 객체 로드
                // -> 동적 로딩 (실행 시점에 객체를 메모리에 올리는 것)
                Class.forName("com.mysql.cj.jdbc.Driver");
                conn = DriverManager.getConnection(url, DB_USER_NAME, DB_PASSWORD);
                System.out.println(">>> Connection Success <<<");

            } catch (Exception e) {
                System.out.println(">>> Connection Fail <<<");
                e.printStackTrace();
            }
        }
        // conn이 null이 아니라면 그대로 반환
        return conn;
    }

    // Connection을 닫는 메서드
    public void connectionClose() {
        // 방어적 코드
        if (conn != null) {
            try {
                conn.close();
            } catch (SQLException e) {
                e.printStackTrace();
            }
        }
    }
}
# DB의 각 레코드들에 대한 클래스 설계
// 예시 : 고객 테이블

class Customer {
    // DB의 각 컬럼에 해당하는 멤버 변수
    private String name;
    private int birthYear;
    private String address;
    private String mobile;

    public Customer(String name, int birthYear, String address, String mobile) {
        this.name = name;
        this.birthYear = birthYear;
        this.address = address;
        this.mobile = mobile;
    }

    // toString을 재정의하면 sysout했을 때 주솟값 대신 멤버변수 값들을 출력할 수 있음
    // [Shift] + [Alt] + [S]에서 아래 형태로 자동 생성 가능
    // 다른 형태를 원한다면 자유롭게 설정 가능
    @Override
    public String toString() {
        return "Customer [name=" + name + ", birthYear=" + birthYear
                + ", address=" + address + ", mobile=" + mobile + "]";
    }
}
# Main (SELECT 문 사용)
public static void main(String[] args) {

    DBClient dbClient = new DBClient();

    // static으로 정의해서, 클래스 이름으로도 접근 가능
    DBClient.setDB_NAME("DB명");

    // 자료 구조 선언, 담을 데이터를 클래스로 모델링하기
    ArrayList<Customer> list = new ArrayList<>();

    // 연결 객체
    Connection conn = dbClient.getConnection();

    try {
        // 문자열들을 SQL로 변경하거나 명령문을 실행시켜주는 인터페이스
        Statement stmt = conn.createStatement();

        // 쿼리문 작성 (마지막에 공백을 하나 입력해야 오류 위험 감소)
        String queryStr = "SELECT * FROM usertbl ";

        // 쿼리를 실행한 결과 집합을 rs에 담음
        ResultSet rs = stmt.executeQuery(queryStr); // SELECT 문을 쓸 때 사용하는 메서드

        while (rs.next()) {
            // 중요 *** get 메서드 내 매개변수는 DB 컬럼명과 동일하게!
            String userName = rs.getString("userName");
            int birthYear = rs.getInt("birthYear");
            String addr = rs.getString("addr");
            String mobile = rs.getString("mobile");

            Customer customer = new Customer(userName, birthYear, addr, mobile);
            list.add(customer); // 리스트에 추가
        }

    } catch (SQLException e) {
        e.printStackTrace();
    }

    // 해당 코드에서는 생략했으나, 원래는 try-catch에 finally 문을 추가해서
    // rs, stmt, conn 순으로 close()해서 메모리를 해제해주어야 함

    // for each 구문 : 데이터 확인하기
    for (Customer c : list) {
        System.out.println(c);
    }

} // end of main
실행

- 다음 단계 : CRUD 기능을 메서드로 만들기
320x100
반응형
'Java > Base' 카테고리의 다른 글
| [Java] Statement와 PreparedStatement (1) | 2023.03.12 |
|---|---|
| [Java] Java로 SQL CRUD 구현하기 (0) | 2023.03.09 |
| [Java] 소켓 양방향 통신 구현 (0) | 2023.03.04 |
| [Java] 소켓 통신 (0) | 2023.03.03 |
| [Java] 입출력 스트림 (I/O Stream) (1) | 2023.03.03 |